
I want to share a fun project with you.
Making your own little Christmas tree with wire coat hangers.
I have to tell you a little story about how I started making these beautiful trees.
Years and years ago, my aunt Beth made these and gave 1 to each family member at Christmas time.
I had mine many many years and then my aunt Beth passed away.
My tree got old and started falling apart. So I decided I would make me and the rest of my family and friends these beautiful trees. I took it all apart and figured out how to do it.
Now you can too.

Isn't it pretty?! I thought so too. Now you can make one also. First, you want to start with 6 hangers. Doesn't matter the size. I have two sizes and used the bigger sized hanger.

Then you put them together like this.


This is what I used to bind the hangers together.


Now add a little bit of hot glue to each one.
Make 2 more just like these two.
So you will have a total of six hangers.
Now you are going to put all three hangers together like this.

You will work with one section at a time until you get all three in there.
After you get them to where you want them, wrap the pipe cleaner pieces around the hangers like this.

Don't worry about getting all the hangers even because it will not happen.
Add a little hot glue to each pipe cleaner.
Also, add pipe cleaners to the middle bottom.

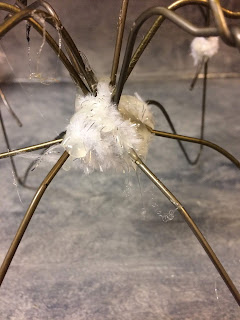
Here is the top view of the tree with all it's pipe cleaners.
Add enough to make it secure and add hot glue.

Don't worry about how it will look.
Also, add pipe cleaners to the middle bottom.


Here is the top view of the tree with all it's pipe cleaners.
Add enough to make it secure and add hot glue.

Don't worry about how it will look.
No one will see this part of the tree.
Ok, now your frame is built, let's add lights.


You can add any style of lights you like.


You can add any style of lights you like.
I have used 20 count, 50 count and this year 70 count and love these the best. Out of the 70 lights, 14 twinkle and I love that.
Feel free to do what you love.
I start at the bottom and work my way to the top. You may want to start at the top and work your way down.
I first start by wrapping a piece of the pipe cleaner around the light cord and wire hanger and add a little hot glue to secure.


Add as many pipe cleaners to the wire hangers as you need to secure it.
Add a dab of hot glue for extra support.
PLEASE be cautious of which end you have you plug.
Make sure the part you plug into the wall is at the bottom of the tree. (Ask me how I know, lol).
Next, we are going to add the garland.
Use whatever you want. I have used just about every color and also the green tree-like garland.
This year I chose this one.
White and silver.


Now depending on what type of garland you buy or have, you may need more or less than what I used.
I used 2 1/2 packages of garland. I find the real cheap garland, you need more to hide what is underneath the tree.
So use your judgment on how much you'll need.


I just keep winding the garland around the wire hangers until I finish at the top. Adding glue where needed for support.


Here is the finished tree with lights.


So much prettier in person.
I hope that the instructions are easy to understand but if not, please feel free to ask questions and I will try to answer them.
Now go make a tree.
Make two or three, lol.
This one took me about 1 1/2 hours to make with taking pictures for this blog.
The cost was $3.79 for the garland times 3.
The lights. Forgot how much but fairly inexpensive.
Wire hangers free.
Had the hot glue.
Pipe cleaners were inexpensive also.
If you make one I hope you send me pictures.
Don't forget to make it your own buy adding bulbs or other types of garland, etc.
The size of the tree will depend on the size of your hangers.
So use your judgment on how much you'll need.


I start by adding a dab of hot glue to the wire hanger and adding the garland to the hot glue.


I just keep winding the garland around the wire hangers until I finish at the top. Adding glue where needed for support.

As you can see the garland covers up the mess underneath.

You don't want to pull so tight it snaps or stretches and you don't want it so loose so it sags.
You will get the feel for it.

Here is the finished tree with lights.


So much prettier in person.
I hope that the instructions are easy to understand but if not, please feel free to ask questions and I will try to answer them.
Now go make a tree.
Make two or three, lol.
This one took me about 1 1/2 hours to make with taking pictures for this blog.
The cost was $3.79 for the garland times 3.
The lights. Forgot how much but fairly inexpensive.
Wire hangers free.
Had the hot glue.
Pipe cleaners were inexpensive also.
If you make one I hope you send me pictures.
Don't forget to make it your own buy adding bulbs or other types of garland, etc.
The size of the tree will depend on the size of your hangers.
Mine was about 12" tall.
Just getting around to looking at all the blogs. This is absolutely lovely and I plan on making them (there are a dozen people I know that would really enjoy these) for next Christmas. Thank you for sharing. barb.killam@gmail.com
ReplyDeleteI'm so glad you are going to make this!! Send me a pic. Would love to see it or them lol!
Delete