
I have been working on these babies since 1917, lol. OK not really, I wasn't even born yet!!
I started on Feb. 13 and just finally got them done.
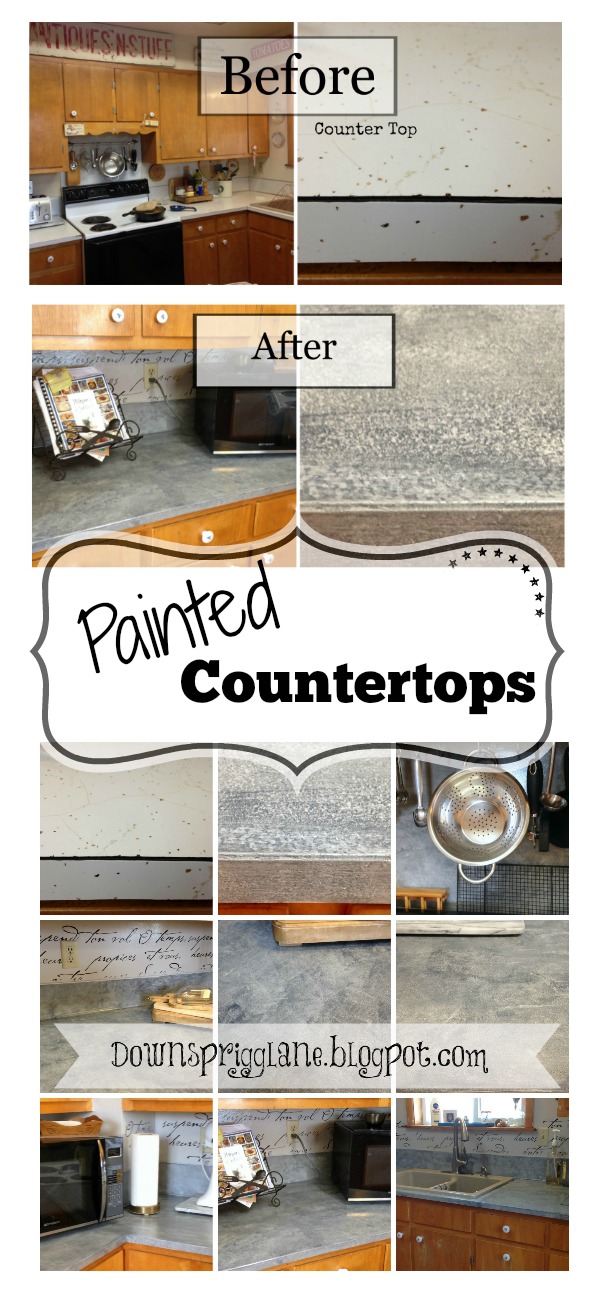

Yep, I have something cooking on the stove and paint on the counter, lol. Not sure when this was taken, maybe a couple years ago.


Close up of what the counter looks like. Anyone else have these lovelies in there kitchen?
Our house was built in 1965 and these are the original counters.
We couldn't afford new counter tops so I have been looking at different options.
Our counters were in pretty good condition for their age. Along the corner on the left side were two cracks (don't know how they got there) but were there when I moved in. I filled the cracks in also.

You can also see a hole, a stain and just the overall dirt where the silver bracket thingy meets the back wall. I washed the counters and back-splash with TSP. Boy was it dirty. Thought I was pretty good at keeping the kitchen clean so it was pretty embarrassing to see!
So after watching how to paint kitchen counters by Paula at Heirloom Traditions on Hometalk, I took the plunge and ordered the Kitchen Counter Kit.
Here is the package from Heirloom Traditions.
Great packaging!


It came with a primer, a gloss, a liquid wax, a brush, a sponge and a couple of free items!


Here I'm brushing on the primer. Just take the brush you're given in the kit and brush it onto the counter.

This is how it looks when done. Notice I painted over the silver (thingy) where the counter meets the back wall.
 |
| Texture on primer |
This is what it looks like after you take a brush and go over the top of the primer for texture. I just took the brush and dabbed it onto the primmer, kinda like a stipple effect (hope that makes sense).
 |
| The brush I used |

Here I am adding the liquid wax onto the primer. I found that by adding the wax then taking a rag and dabbing it onto the wet wax in little sections worked better. You can see the back splash already finished.


While I love the outcome of the counters, I ran into a few problems.
1. When I put the gloss onto the wax with the brush, it would smear. When you take the rag and make the design on the wax, by adding the gloss it would take that design and smear it. I figured out quick that if I used another flat brush (not the one they sent) and went in one direction, it wouldn't smear as bad. I did wait for the wax to dry (4 days to be exact, still smeared). So that was lesson #1, lol.
2. The gloss is not water proof. I let it cure the amount of time requested on the can and was careful to put towels around the sink. I had 3 coats of gloss on and it still would leave white spots and under Mr. coffee machine there was some water that had been left for about 5 hours before I noticed it and it had taken it down to the wax and primer. I was bummed.
I ended up calling Heirloom Traditions and spoke with Paula. I guess it is not actually made for counters and she said that no product would withstand water for very long. Before I bought this kit, I had asked if I could clean it with 409 and if it would hold up to water and HT responded with a yes, so who knows. Paula did say that me and one other gal had this problem but no one else.
One other note, the kit cost $89, which isn't bad, but because of the troubles I experienced, I had to buy more primer and more gloss because when it smeared and dried and gloss applied, I ended up sanding it back down to the original counters and start over.
I ended up buying Min-wax clear polyurethane to seal the counter tops and so far it seems to be working.
So far I had to buy the kit for $89, extra primer and gloss $99 and the min-wax was $9. Still cheaper than buying new counters but very frustrating it didn't work the first time.
Would I buy it again, yes, BUT I would only buy the primer and wax.


Next I will show you what I did with the back of the walls.
Thanks for stopping by,
Pin and comment if you like,
Thanks for stopping by,
Pin and comment if you like,

Linking up to these wonderful Parties:
Link It Up Wednesday - Raven Would
Happiness is Homemade - Blogghetti
Inspiration Galore - Recreated Designs
Nifty Thrifty Sunday - Nifty Thrifty Things
BFF Link Party - The 36th Avenue
Best of the Weekend - Sweet Pea
Snickerdoodle Party - Blue Willow House
Creativity Unleashed - The Kim Six Fix
Home Matters - Life With Lorelai
Party In Your PJ's - Woods of Bell Trees
Dream. Create. Inspire. - Little Bits of Home
Best of the Weekend - Ms. Toody Goo Shoes
Painted counters is a good short term solution. I painted mine, with a different product and they lasted about 3 years before they started peel. It gave me enough time to save for the countertops that I really want! I wish you luck with yours because they really turned out nice!
ReplyDeleteI'm hoping I can save for some actual countertops also! Thanks for stopping by!!
DeleteYour counters turned out great. Thank you for sharing at the Snickerdoodle Create~Bake~Make link party!
ReplyDeleteThanks for stopping by Sharon!
DeleteWhat an amazing difference. My kitchen looked so much like your before we remodeled. The cabinets were similar, stove placement identical, and I had the exact counters. (We still have them in our laundry area.)
ReplyDeletePainting the counters is a great short term solution and it really gives your kitchen a new look.
I used one of Heirloom Traditions products to update a leather chair and ottoman last summer. It has held up pretty well and definitely is giving us extra years of use.
It definitely is a temporary solution until we can afford actual counters but it is so much better than the old ones!
DeleteWhat a hassle & lot of work. I'm sorry you had trouble, but I'm so glad that you called the company & let them know. If no one complains, things never get better. In the end, your countertops look lovely!
ReplyDeleteI came to visit from Happiness is Homemade bloghop; I hope you'll have time one day to visit the 4Shoes & let me know that you've been by.
Thank you so much for stopping by! It is a hassle and waste of time but I did like how it turned out. Seems like I have towels every where to protect it and that is a pain for sure!
DeleteThe counters look great! Thank you for sharing at Ravenwould.
ReplyDelete