Well I am loving my counter tops, even though it was a total hassle! And I am slowly working on painting my cupboards but lack the want to keep going, but I will, lol!
So, I am doing a product trail called LeakSeal with Rust-olem! It's a Flexible Rubber Coating which seals leaks and cracks instantly. It's water-tight and paintable.
We have a basement in our home and it looks basically the same as the upstairs but where the kitchen would be downstairs is just and extended living area.
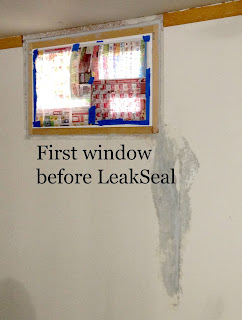
We have two windows that set just at dirt level. These windows have leaked since we had a contractor put them in 20 some years ago. I have tried a few things over the years but nothing has worked. So they have had nothing around them and I have taken the frame of one window down a long time ago. Our seasons are pretty dry here but this last winter was very wet and we had snow on the ground for about 3 months, which is unheard of here. Anyways, it leaked again, going down the cement wall.
When Rust-oleum was picking 50 people to sample their product, LeakSeal, I was hoping I would win and get the chance to try it! I did, Yay!! So this is about LeakSeal.
I apologize but I hate seeing these pics and for ignoring the problem for so long. But I think we have a winner.
I had to move everything away from the walls and then start sealing.
First I received the LeakSeal.
Which came very nicely packaged for paint!
Then I cleaned up the window and wall area to make sure it was clean.
 |
| First Window |
 |
| 2nd window |
 |
| 2nd window before anything applied |
Since LeakSeal only seals crack and gaps up to 1/8" I had to fill in the rest of the window with other products. So after cleaning the area I wanted to put in Concrete & Mortar Filler & Sealant by DAP. But the gap size was to big for this product as well, lol, so I went with Quad Foam (window & door door foam. I had foam in the large areas but needed to fill more of the gaps.
 |
| Foam added |
 |
| Foam cut and trimmed |
After all the foam was dry and the concrete sealer was dried, I applied the Leakseal.
I only added foam where there were big gaps. Concrete sealer on each side and bottom. And I must mention that the two windows did not leak above the ground level.
 |
| Wet application |
 |
| Just applied LeakSeal |
 |
| Dried 1st window |
The product was easy to apply. Sprayed 1st coat on lightly and waited about an hour (only need to wait 30 minutes) then applied a 2nd coat. I loved how there were no drips AT ALL! It also dries to a matt finish.
After I let this sit for a day, I tested it out. I ran a water hose outside the windows and let sit for about 5 or so minutes at full stream. After the water soaked in I went a looked at the results and the picture of that is above. I am very happy to report that nothing leaked. I am sure it helped with applying the other products too but in the end they all played well together.
Next up I will be putting shiplap up on the wall. That is why I didn't care how it looked in the end, which is horrible. But now that the leaks are fixed I can move on to redoing the horrible downstairs basement. Stay tuned and hopefully I will finish it this sometime this month. The kitchen cabinets, well, that is another story. Hopefully soon.
Do you have any major reno's going on right now?
Let me know in the comment section!


No comments:
Post a Comment
Please visit my site at downsprigglane.com
Note: Only a member of this blog may post a comment.